Master pages provide the ability to separate the
layout of the rendered page from the page containing the actual content.
Master pages were also a major component in SharePoint 2007, and while
backward compatibility has been preserved with a number of new
SharePoint 2010 master pages, those new master pages with the version 4
label attached to them are not backward-compatible. However, all version
3 master pages are compatible with SharePoint 2010, although some
functionality will be missing.
1. v4.master
This is the default team
site master page and the one that is suggested as a template when
creating a new or custom branded master page. This master page provides
the new ribbon bar as well as other UI changes. Also the Site Actions
button is moved in SP 2010. It now appears in the upper left corner.
2. default.master
If a site is upgraded
from SP 2007, it uses this master page per default. The Site Actions
button is located on the upper right side, and the UI mainly is the same
as in SP 2007. This master page does not include the ribbon bar. The
sites using this master page can be changed to use the new version 4
master page, named v4.master, or any custom branded master page based on this.
3. minimal.master
This master page is
close to being the simplest possible. It is used only by the search
centers and Office Web Applications. One of the things most people
quickly notice when using sites based on this master page is the lack of
navigation. It is arguably a significant lack of functionality, and
although the purpose is to provide more screen real estate for search
results as well as making the search center appear cleaner, it is
something that should be changed in most corporate sites. It does make
more sense for the Office Web Applications, as they have their own UI.
In any case, this is how the minimal.master is in SP 2010 out of the box.
4. simple.master
This master page is used by
the generic SharePoint 2010 pages such as login and error pages. It is
not possible to use another master page for these pages. The only option
to customize these pages is to create a replacement page and override
the existing ones by saving it in the _layouts directory on the server.
The following pages use simple.master:
Login.aspx
SignOut.aspx
Error.aspx
ReqAcc.aspx
Confirmation.aspx
WebDeleted.aspx
AccessDenied.aspx
5. Other Master Pages
SharePoint 2010 includes a lot
of other master pages that are typically not required to be manipulated
when creating a custom branded layout. It is suggested to leave them
unchanged unless a special reason exists for not doing so. These master
pages are
application.master
applicationv4.master
dialog.master
layouts.master
layoutsv3.master
pickerdialog.master
rtedialog.master
simple.master
simplev4.master
mwsdefault.master
mwsdefaultv4.master
admin.master
popup.master
6. Considerations When Creating a Custom Master Page
The first prerequisite
best practice approach before creating any custom branded master page is
to create a SharePoint web site. The suggested standard site template
to use when creating a site collection is the Team Site template. Using a
well-known fully featured site makes it easier to evaluate if the pages
show as expected. Once you have a web site created, you are ready to
start modifying it.
In any case, when it comes to SharePoint, it is always
best practice to start creating your custom branded master page based
on one that already works. Experience shows that this reduces headaches
and avoids spending hours on solving issues related to hard-to-find
errors. Using the v4.master that
comes with SharePoint as a base and trimming it down a bit is usually a
good approach. Then initially apply the custom branded template to only
one site, and ignore any quirks that you might experience if applying it
to your other sites. Only when the master page is behaving as expected
on your initial baseline site should it be deployed to the rest of your
sites.
Once the base master page for
the custom branded master page has been extracted or created, it is best
practice to give it a meaningful name. Remember to include v4 in the
beginning of the master page name if it is based on a v4 master page for
consistency purposes. Then copy it to the all files/_catalogs/masterpage folder of the SharePoint farm using SharePoint Designer 2010.
If custom CSS files are
required, use SharePoint Designer 2010 to create new CSS files rather
than changing the existing ones. They should be saved in the Style Library
folder. New CSS files will instruct the web browser to overwrite the
default SharePoint theme with the new theme that you specified in your
CSS file, with the !important syntax. Best practice is to create four
separate individual CSS files for header, footer, navigation, and
content page.
To make sure the new CSS files work as expected, they should be registered in the custom branded master page with this syntax.
<SharePoint:CssRegistration name="/Style Library/APMcss/custom_footer.css"
After="corev4.css" runat="server"/>
Begin editing the master page
and using the element class and ID name that were declared in your CSS
file, until the master page looks like what you wanted.
It is best practice to keep layout consistent throughout our sites. Items that should stay consistent on the sites are
Header, footer, and other layout segments
Navigation panes and main navigation controls on pages
General layout and look of the page; this includes images, border styles, table layouts, etc.
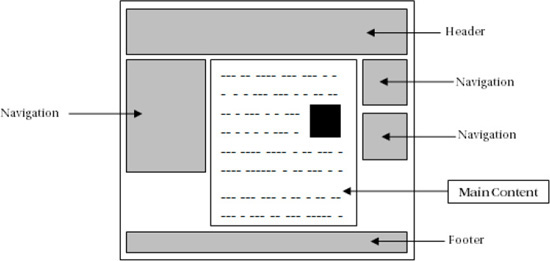
In SharePoint the default
layout (as is also a generally accepted layout principle) contains the
content in the middle between the header, footer, and navigation panes (Figure 1).
This way it is the center part of the page that will be updated when
navigating and new contents will be displayed in the middle. In the
master pages, this is also where the main content placeholder is
located.
The main content tag is formatted like this.
<asp:ContentPlaceHolder id="ConentPlaceHolderID" runat="server" />
When any page is created
using a custom master page, Web Part zones or content areas should be
added only within this custom place holder unless a specific reason
exists for doing otherwise.
Once you have finished
customizing your master page, it is good practice to create a SharePoint
2010 solution package, so that you can deploy your customized master
page to a SharePoint server farm and re-use it for other site
collections. Solution packages can be created using Visual Studio 2010.
More details on this topic are available on http://technet.microsoft.com/en-us/library/cc262995.aspx.